Showing posts with label DIY. Show all posts

Distressed Denim DIY

Thursday, April 7, 2016

In yesterday's post, I styled my distressed jeans for a classic chic look. But they weren't always distressed! Today I'm sharing a little DIY for my distressed denim. I got these jeans months ago from my local Goodwill for $5, and I have worn them so much. I never have been a fan of the boyfriend jeans look, but these are about as close as I'll get. They are slightly loose in all the right places, oh so comfortable, but still fitted. And last week, I decided I wanted to make them a little distressed! After reading a few articles on doing it yourself, I decided on the method Song of Style uses, and I adapted it just a bit.  

You only need jeans, scissors, tweezers, a seam ripper, and a piece of sandpaper. To figure out where I wanted to put distressing, I looked up "distressed jeans" on Pinterest for some inspiration, as well as looked to see where my jeans were wearing down already. Then I just went for it! The trick is to cut horizontally (only horizontally!) in two places, on the top and bottom of where you want the distressing to occur. Then gently pull out the blue threads with tweezers, which run vertically. Easy peasy! I used the seam ripper to add distressing to the pocket edges, and went over the pieces I pulled with the sandpaper. After it seems like you're all distressed out, throw the jeans in the wash to help the distressing look more natural! 

Part of me feels as if I didn't distress them enough, but I also know as I wash and wear them these jeans will probably get more distressed naturally. And I can always add more later :)

Have you ever DIY distresses a pair of jeans? Any tips? 
--Caroline

DIY Olaf Costume

Thursday, March 5, 2015


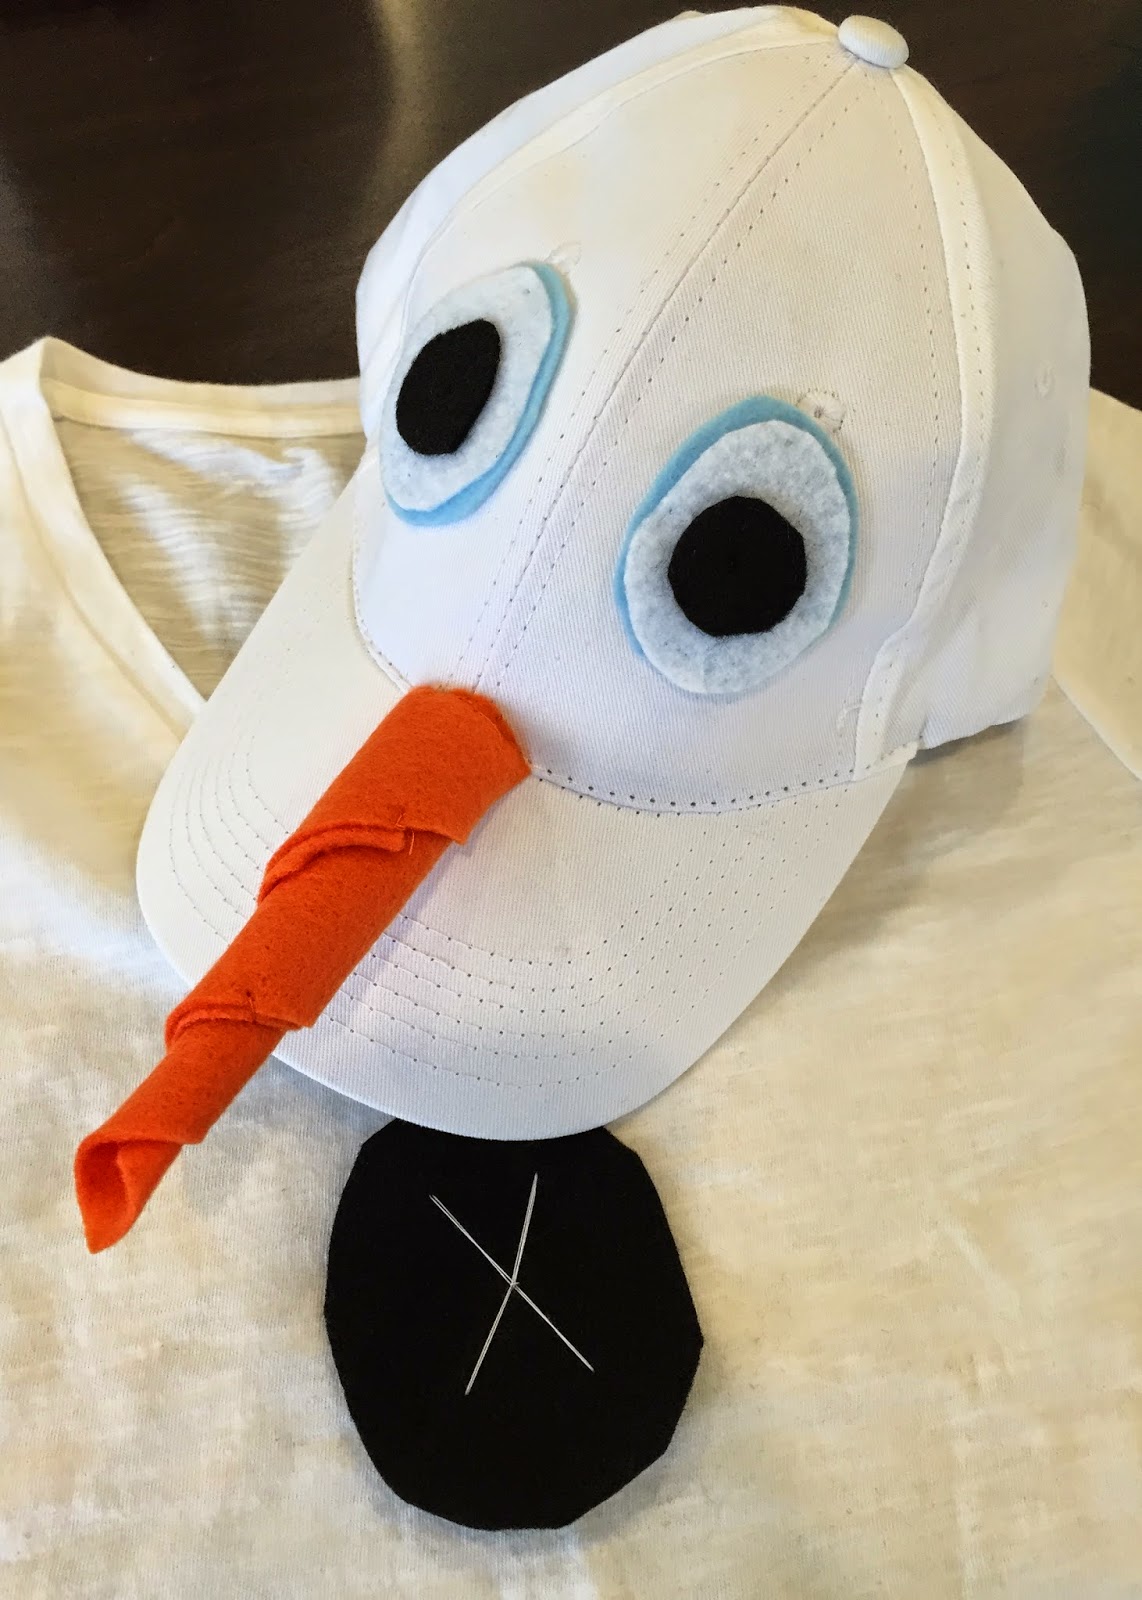
I recently did a DIY Olaf costume for a friend's birthday party, and thought I'd share it with y'all on This Styled Life! It was pretty simple, and I started by collecting the following materials, all from Hobby Lobby:
-- White t-shirt or other white top (I picked up this one from Target)
-- White baseball hat 
-- Felt in white, black, ice blue, and orange
-- Needle and thread (I just used white and orange)

For the top, I just cut the black felt into circles, and sewed it onto the top in a row. I used my creative license to make them look more like buttons, and did the X of white thread, but you could easily make it look more uniform by using black thread. 

The hat was a little bit more involved. I started with the eyes, making oval shapes with the felt. Going off of a picture, I used icy blue felt in the back, cut a slightly smaller white piece, then finished with a black circle. Then, I sewed them on the hat, spaced enough to look like eyes. In the essence of time, and because I wasn't looking for longevity with the hat, I just sewed the eyes on in five places: the center of the pupil, and then at the top, bottom, left and right. Make sure you leave enough room for a nose!


Now onto the nose... This was a little tricky. I just kind of had to play with my felt, rolling it a million different ways before I discovered the right size and look I was going for. I ended up cutting the 8x11" sized felt in half, rolling it, then cutting off excess. You might find a better way to make it happen, but that was the best I could come up with! I used orange thread to sew it together a bit before I sewed it onto the hat. 


In the end, I think it was a successful DIY and I looked just like Olaf! The whole process only took me about 30-45 minutes, and materials were in total less than $20. I paired the top & hat with a black statement necklace, black jeans, boots, and a gray cardigan. 

Enjoy! If you end up making one for yourself, let me know how it goes!
--Caroline


Year In Review

Wednesday, December 31, 2014

My oh my 2014 went by fast!

So many things have grown this past year: this blog, my world view... it's been an amazing year and I can't wait for what 2015 has in store for me! I'm truly blessed to have such a wonderful life, shared with wonderful people who encourage me and inspire me every day. Today, I'm sharing some highlights from my blog from 2014, and I hope some of these posts inspired you in some way in 2014!

In 2014 I...

Shared some DIY recipes and projects with you...

Created outfits inspired by the design world...

Took you on a fashion journey around the world...

Gave you a little OOTD inspiration...

Shared some of my interior design knowledge with you...

And talked about makeup & hair...


These are just snippets from the past year. Thank you all for reading in 2014; I sure had fun writing and sharing my style with you all! This Styled Life has grown a lot this year, and I can't wait to see where 2015 will take me.

Happy New Years Eve! 
--Caroline


DIY Fall Wreath

Monday, October 13, 2014


Last week my roommate and I decided to have a little girls night, and we had some of our friends over for a fall dinner party. Last minute, I decided that our front door needed a little fall decoration, and after sticker shock from pre-made wreaths at the store I set out to make one myself. My impromptu decision ended up being a success, so I thought I'd share my process!


First step? Gather materials! I used a 16" styrofoam wreath circle, two types of ribbon (burlap and a silky copper), and a fall floral piece. I also used sewing pins throughout the process. All purchased at Michaels, and my total cost was just under $30. I started by taping the floral piece to the wreath. Then, using pins to keep the burlap ribbon in place, I wrapped it around the wreath, starting underneath the floral piece.


I continued wrapping the burlap, using pins along the way to keep it smooth. Voila! Then, I added the second copper colored ribbon, tacking it with a pin underneath the floral piece. I wrapped it loosely, to keep the wreath lighthearted and fun. For the hanger piece, I used leftover burlap ribbon to create a loop, which I attached with probably more pins than was necessary. If I'm being honest, there is probably a better way to attach a hanging loop, but this was an impromptu project and I just did the first thing I could think of!

And then, with everything complete, I hung it up on the door, adding a little extra bow on top! I'm pleased with the outcome, and the whole project took me about 30 minutes; I finished just in time for the party!

Have you every made your own wreath before? Any tips?
--Caroline


Star Spangled Nails

Wednesday, July 2, 2014

With the 4th of July around the corner, I've been seeing a lot of America-inspired nails on Pinterest and social media. 
Buzzfeed has a great little article showing 36 DIY Manicure Ideas, and this article has other great 4th of July Nail Art Ideas. 
Some of my favorites? See below!

Which one would you try?
--Caroline

DIY Coral Nightstand

Tuesday, July 1, 2014


The other day, I mentioned I would be sharing with you a DIY project I was working on... Painting my nightstand coral. I got this nightstand originally from Target, because the antiqued mercury glass front matched other decor pieces in my bedroom. (And it was on clearance.) Both my desk and my dresser are a darker wood, but I thought it wouldn't bother me too much for this piece to be lighter. 
But after a whole year, it does. So something had to change. 
I have touches of coral in my room, so I thought why not bring that pop of color into my nightstand!


First, I gathered my materials. I picked up semi-gloss paint from Walmart, where the clerk was very intrigued to know what I was going to paint such a bright color. My mom and I get that a lot--We aren't afraid of color at all! I already had the brushes and sandpaper on hand, and I actually ended up doing touch ups with a smaller craft brush. To prep the nightstand for paint, I went over the whole thing with a gentle layer of sanding. Even though the original finish wasn't super glossy, sanding gives the paint something to stick to. It just seemed like a good idea!  

Then, I painted! I alternated the direction of my paint layers--horizontal, then vertical, then horizontal, etc-- and to combat the sticky Florida humidity (let me just tell you, if I had done this in Colorado it would have dried so fast!), I used the following method:
* 2 layers, almost back to back, then let dry for about an hour to 1.5 hours.
*1 layer, wait for it to dry, then move it inside for afternoon rain showers & to dry in the cool inside air.
*The next morning, do 2 more layers. The last layer is where I used the smaller brush to get the legs fully covered.
*Then, bring the nightstand inside, to let dry inside for at least 48 hours.

Somewhere in there, I painted the trim around the drawer, because initially I was thinking I might keep it the wood color. I also wasn't sure if I liked the original knob or not. After checking how it looked on the morning of the second day before my last two paint coats, I decided I wanted the drawer coral too, as well as a new knob. After a trip to Hobby Lobby... Voila! 

I'm so happy with how it turned out! And because I basically immediately left town, I was able to put it in my room but not put anything on it or in it, so it has more time to fully cure. I can't wait to see how it looks in my new apartment in August... 
Stay tuned for pictures! 
--Caroline


Five Friday Favorites

Friday, June 27, 2014

This week has flown by! I'm in Daytona now with Kyle and our kitty boys, so I'm pretty happy to finally be able to relax. Here's what happened this week...

1. On Sunday, I started a DIY project, which you'll get to hear more about next week!

2. Packing. Lots of packing. While packing isn't fun, it means my marathon vacation of Daytona-Colorado-Europe is about to start! I'm so excited!

3. For Premier, I took part in a Trunk Show at the fitness studio I attend in Tallahassee (The Refinery), which was a blast! 

4. I did a good deed by cleaning out my kitchen and donating a lot of non-perishable items to a local food bank. I love being able to give back to my community, even if it's not as often as I have time to. It's the simple things in life. :)

5. I'm in Daytona and my month-long vacation has started! It's as simple as that! 

Hope y'all have a great weekend! 
--Caroline

No More Boring Staircases

Monday, June 23, 2014

Stairs. Most houses have them. In most houses, they are pretty darn boring. In most houses, they are one of the first elements seen upon entry. Ergo, in most houses, stairs give a boring first impression. But it doesn't have to be that way! There are plenty of fun things you can do to your stair risers to make them a reflection of your and your decor. 


Tile
Whether it's Mexican ceramic tile, mosaic tile, or mirrored tiles as seen here, tile is a great way to add both texture and variety to your staircase! You can achieve a variety of looks depending on what tile you choose. When using it on the risers, you are not limited to tiles that can withstand being stepped on, so splurge for something pretty and decorative.

Custom Paint
Try doing a DIY paint job on your stairs. A chevron pattern like the one here would be easy to implement by using painters tape. If chevron is too much, try simple stripes for a classic & elegant look. I also love the effect of doing every other stair!

Wallpaper
Easy to apply on such a small area, wallpaper is a great way to liven up your staircase. Try the textured wallpaper look seen here, or give each stair a different wallpaper for an eclectic look like what was done here. 

Text
Use wall decals like these over solid paint to have your stairs tell a story. If you're really crafty, I'm sure you could DIY this by hand, but I love how simple it is to just paint and slap on a decal! 

Ombre
I love the multi-color ombre effect on these stairs! If that's too much color, try picking just one color, or do an ombre with a neural like gray for a more subtle yet sophisticated touch. 

How would you liven up a boring staircase? Have you tried any of these?
--Caroline


Mani Monday: Colorblocking

Monday, March 3, 2014

Happy Monday, rather, Happy Mani Monday!

I recently tried something new with my nails... Colorblocking with neutrals!

Using Essie "Rock The Boat" and O.P.I "Samoan Sand", I put the pale blue pop on my ring fingers, keeping the other nails neutral. What do you think? Cute, right?! Can you tell I want to be on vacation? All these neutrals and blues... See my post on the nautical trend, and my post featuring chambray sneakers and find out just how ready I am for spring break! Eeep! One more week until relaxation in Daytona with my handsome man!

--Caroline

Linking Up With: What I'm Loving Friday's 

Closet Organization: Making Your Closet Pretty

Thursday, January 30, 2014


Welcome back to my two-part series on closet organization! Yesterday I talked about how to clean out your closet, and now it's time to put it all back in, organize it, and make it look pretty! (AKA the fun stuff!)

Tuesday morning, when I did my clean-out, I assessed my closet after sorting everything into piles. I already had a good base, but I was missing just a couple key organizational tools, which I wrote down and went out and bought later that day. 

Here are some tips and tricks to making your closet organized, functional, and pretty!

Matching hangers. They streamline everything, and give you a cohesive look. Plus, coordinated hangers put the focus on your clothes, not the miss-match of hangers.

Keep shoes easily visible. On shelves like these, I can see & find all my shoes easily, plus they don't scuff by rubbing against each other in a huge pile. Too keep the shape in my boots, I cut pool noodles to match the height of the boot shaft and stick them inside. 

Put a little sparkle in your closet! Display your statement necklaces on a cute rack (I found mine at Target) so that you always have easy access to them while getting ready. Plus it just looks pretty! :)

Get creative, and don't be afraid to use something in a different way. This hanging shoe holder works perfectly for storing scarves and rolled t-shirts.

Put bags within reach but easily seen. I have a small basket that holds my clutches, and then I line my other purses next to that on my closet shelf. I keep the form of my purses with either a smaller purse or plastic shopping bags. 

Keep drawers clean. I fold my t-shirts and shorts/jeans so that I can see all of them at once!

So that's my closet... do y'all have any tips or tricks for organizing yours? 
--Caroline


Closet Organization: Clean Out

Wednesday, January 29, 2014

I like to get up early to get a nice start on my day. So, what did I do with my extensive morning time on Tuesday, you ask? Cleaned out my closet and organized it! (Bet you didn't see that one coming!)

I have always loved cleaning up my closet, just ask my mom. As a kid, she'd tell me to go clean my room and I'd run upstairs and... organize my closet. I'd hang outfits together, I'd hang my clothes in ROYGBIV order, and one time I even organized it by brand! Probably not normal kid behavior. Needless to say, I've never had a problem editing my closet. I'm constantly going through and weeding out pieces I don't love anymore, which I then sell to a consignment store, sell online, or donate. 


So in this two-day series, I'd like to share with you just what happened Tuesday morning. Today, we'll start with cleaning out the closet. 

Here are some questions I've come to ask myself when deciding what stays and goes:

Do I love this? We all want to look a feel our best right? This can only be accomplished by keep the things we love and love on ourselves in constant rotation in our closet. This is the most important question the the clearing out process. 

Does it fit? Unless you are pregnant, don't keep things in your closet that don't fit! 

Can I think of at least 5 ways to wear it? Simple: if you can't automatically come up with ways to pair something, than it's really not helping your closet function. The exception to this would obviously be those special occasion pieces, but those default back to the question, do you love it?

Can I wear at least 5 Premier necklaces with it? This is a factor for me, since I'm always marketing myself and my jewelry company. While I let a top or dress slide here or there that does't reach the count, it is important that the necklines and colors of my clothes can pair well with the current jewelry line. This question can be adapted to fit your specific work wardrobe needs. 

When was the last time I wore it? We all have those impulse shopping regrets, or the one top with love the idea of but never end up actually wearing outside the closet. If I can't remember wearing it recently, I reconsider it's place in my wardrobe. I actually love asking this question on a weekly basis, come laundry day. I look at what is still handing when my laundry bin is at full capacity, and think about what's left. Obviously one can't wear everything they love within a week or so, but assessing your left behinds now gives you a better idea of what maybe isn't loved as much. 

And here are some tips for having a great closet-clean out session:

Make piles as you go! Keep, Sell, Donate, and a Dry Clean/repair pile.

Take a picture. I do this when I'm shopping for clothes too, but taking a picture of your outfit and seeing what it looks like through a lens can be very helpful in getting a sort of outside perspective on whether or not the item should stay or go. ("That's what I look like in this?! Eeek!")

Do it in small pieces. After too long, you start to give in easier, and "likes" become "loves". This is why I try to always asses the items in my closet, because after too long I lose the harsh focus and drive necessary to get down to the "loves". (For example: I had already set aside a small pile of clothes I no longer wanted a couple days prior, although I certainly added to it Tuesday morning!) For you, this might mean taking a snack or lunch break, or checking your emails before getting back to the task at hand. 

Gain inspiration from the internet! Reading articles or posts like this give inspiration and drive to even the most seasoned closet cleaner. Pinterest can be a great source for this, which is where I found this great blog post and the following picture. 


I hope you find these tips & tricks useful! Check back tomorrow for the organization tricks I use in my closet.

--Caroline


Silver & Gold New Year's Eve Party

Saturday, December 21, 2013

Christmas is less than a week away! Where has December gone?! Soon it will be 2014, which is an even crazier thought! But don't worry, I've got some great ideas coming your way for a fabulous New Year's Eve party!

Initially inspired by the table scape with circle streamers, a silver and gold theme is a great way to link Christmas (think the Burl Ive's song Silver and Gold) with the excitement of the new year. Take silver and gold scrapbook paper, cut out circles, and string them together for a nice touch over the food table.

Trade out the evergreen wreath on your door for this DIY number! Take a foam circle (found at craft stores) and pin brass thumbtacks in it, covering the whole thing. Add a pop of color in a bow, or add a variety of ribbons in silver and gold, hang it on your door and voila! 

Festive party napkins (order here) would be the perfect match to basic plates.

Decorate guests as they come in the door with embellished party hats, made by gluing rhinestones and other sparkly things along the base.

And finally, once midnight comes, cheer in the New Year with a toast of champagne, the glass adorned with star streamers for a festive touch. 

So get your guest list going, and check it twice! 

(All images found via pinterest, feel free to contact me if you want me to track down the pins themselves.  Collage made by yours truly!)

--Caroline

DIY Artwork

Monday, December 16, 2013

Happy Monday!

To cure your Monday blues, here's a look at how I spent my Friday afternoon.
I've had a blank canvas hanging on my wall for months just waiting for time to actually paint it.
And finally, with finals behind me, I did!
Inspired by Sarah's tutorial over at While They Snooze (find it here), I set out to make my canvas not blank anymore. 

First step? Gather materials!

Second step? Paint the whole canvas silver!


Then the fun began… Starting at one corner, I used 1" painters tape to create diagonal stripes across the canvas. Then I randomly added tape going in the other direction. I didn't measure anything, just let it be random.

Then I took my colored paints and made vertical strokes on the canvas. I added a little more of the metallic spray paint on top, keeping with the vertical motion. 

After letting it all dry for about 30 minutes, I took the tape off and voila! 

I'm so happy to not be staring at a blank canvas anymore!

--Caroline